How to Reset BMS on LiFePO4 Battery: Step-by-Step Guide (2026)
Table of Contents
- Introduction: When Your LiFePO4 Battery's Brain Needs a Reset
- What Is a BMS Reset & When Do You Need One?
- Why Does the LiFePO4 BMS Enter Protection Mode?
- Signs Your BMS Needs a Reset (And When Not To)
- Before You Reset: Tools & Finding the Reset Button
- 5 Methods to Reset BMS on LiFePO4 Battery
- How to Unlock a BMS That Won't Respond
- Resetting 48V Rack-Mounted & Solar Battery BMS
- LiFePO4 BMS vs NMC/LTO: What's Different?
- Brand-Specific LiFePO4 BMS Reset Methods
- Common BMS Fault Codes and What They Mean
- Reset Didn't Work? Fixable Fault vs Hardware Failure
- After the Reset: Balancing, Calibration & Prevention
- B2B Fleet & ESS Maintenance to Reduce Reset Downtime
- Related Resources
- Frequently Asked Questions
- Summary
How to Reset BMS on LiFePO4 Battery: Step-by-Step Guide (2026)
Last updated: September 2026 | Written by the Enerbe Engineering Team
Introduction: When Your LiFePO4 Battery's Brain Needs a Reset
Quick Answer: To reset a LiFePO4 battery BMS, disconnect all loads and chargers, wait 3-5 minutes for the BMS capacitors to discharge, then reconnect the charger first. This simple disconnect/reconnect clears about 80% of LiFePO4 BMS protection events. If that fails, use the physical reset button (if equipped), a charge wake-up, a BMS app/communication tool, or the full unlock sequence below. A LiFePO4 pack showing 0V is usually in protection mode—not dead—and most packs recover with a reset and a slow charge.
The Battery Management System (BMS) is the brain of your LiFePO4 battery. It monitors cell voltage, temperature, and current to keep the battery safe and extend its cycle life. Unlike lead–acid batteries, LiFePO4 packs rely entirely on the BMS to prevent over-discharge, over-charge, and thermal issues. To understand what every BMS protection and parameter means before you reset anything, see our What Is a LiFePO4 BMS? Functions, Parameters & Selection Guide.
Sometimes the BMS enters protection mode or fault lockout after an over-discharge, short circuit, over-current event, or temperature extreme. The battery then shows 0V output, refuses to charge, or disconnects from the inverter—and you need to reset the BMS to bring it back.
This is the complete LiFePO4 BMS reset reference: what triggers protection, how to confirm a reset is needed, where to find the reset button, five reset methods in order, how to unlock a BMS that won't respond, brand-specific steps (Renogy, Victron, Liontron, Supervolt, Dakota Lithium, JK, Daly and more), 48V rack and solar procedures, fault codes, and how to tell a resettable fault from genuine hardware failure. The principles are the same for 12V, 24V, and 48V LiFePO4 batteries used in RVs, marine, golf carts, solar, and commercial energy storage.
If your pack has been sitting at 0V for weeks or months and the charger won't even recognize it, that is a deep-discharge wake-up rather than a simple reset—use our dedicated How to Wake Up a LiFePO4 Battery guide. For sourcing across all applications, see our B2B Sourcing Guide.
What Is a BMS Reset & When Do You Need One?
A BMS reset is the process of restarting the Battery Management System after it has entered a protection or fault state. The BMS continuously monitors cell voltage, temperature, current, and state of charge, and it disconnects the battery when it detects an unsafe condition. When that protection "latches," a reset clears the fault state and lets the battery resume normal operation—think of it like rebooting a computer after a freeze.
A standard reset only clears active fault codes and reboots the BMS processor; it does not erase your voltage thresholds, current limits, or capacity calibration. A factory reset is different—it returns the BMS to defaults and should only be done by an authorized technician with a saved configuration. For the full list of what a BMS does and how its protections are configured, the LiFePO4 BMS functions and selection guide covers OVP, UVP, OCP, SCP, temperature cut-offs, balancing, and communication protocols.
Reset vs wake-up vs calibration—don't confuse them: A reset clears a fault latch (this article). A wake-up revives a deeply discharged/0V pack whose charge MOSFET is off so the charger cannot see it—see the wake-up guide. A calibration relearns battery capacity with a full charge/discharge cycle when the SOC % is inaccurate. Reset first, wake if there is 0V, then calibrate only if SOC stays wrong.
Why Does the LiFePO4 BMS Enter Protection Mode?
LiFePO4 BMS units are deliberately conservative—they shut the battery down at the first sign of danger to protect the cells. This is a safety feature, not a defect. Identifying the trigger helps you choose the correct reset method and prevent it from coming back.
| Trigger | What Happens in LiFePO4 | How to Identify |
|---|---|---|
| Over-discharge (most common) | Cell voltage drops below ~2.5V (10V for 12V, 20V for 24V, 40V for 48V) | 0V output, no response to charger, battery left discharged for weeks or parasitic load |
| Over-charge | Cell voltage exceeds 3.65V (14.6V for 12V, 29.2V for 24V, 58.4V for 48V) | BMS stops charging, charger errors, wrong charger voltage used |
| Short circuit | Sudden current surge triggers SCP (Short Circuit Protection) | Instant disconnect, spark or pop, wiring crossed or shorted |
| Over-current discharge | Draw exceeds the BMS continuous rating (e.g. pulling 130A on a 100A BMS) | BMS trips mid-use, inverter shuts off under load |
| Over-temperature (charge) | Battery exceeds ~45°C while charging | Charging stops, battery hot, charging in direct sun or enclosed space |
| Under-temperature (charge) | Battery below 0°C while charging (LiFePO4 cannot charge below freezing) | Charging stops in winter, cold battery, no heater fitted |
| Cell imbalance | One cell deviates more than 0.1-0.3V from the others | Imbalance fault code, reduced capacity, old or deeply discharged pack |
| Communication error | CAN bus / RS485 / Bluetooth signal lost between BMS and inverter/monitor | System reports comm failure, inverter shows no battery data, loose cable |
Important for LiFePO4: unlike NMC, LiFePO4 cells tolerate over-discharge well. A LiFePO4 battery that shows 0V is usually not dead—it is in BMS protection, and a reset plus slow charge recovers most packs. This is one of the chemistry's key safety advantages. For the underlying safety limits and standards, see our LiFePO4 Battery Safety Guide and BESS Certification & Compliance Guide.
Signs Your BMS Needs a Reset (And When Not To)
Before resetting, confirm the symptoms actually match a BMS protection event. This avoids resetting a battery that has a charger, wiring, or hardware problem instead.
| Symptom | Likely Cause | Will a Reset Help? |
|---|---|---|
| Battery shows 0V on multimeter | BMS disconnected output (over-discharge protection) | Yes (reset, then wake-up if at 0V for weeks) |
| LiFePO4 battery won't charge | BMS in sleep mode / charge MOSFET off | Yes (charge wake-up); other causes covered in the not-charging guide |
| Battery won't discharge / no output | Over-current or short-circuit protection triggered | Yes (after removing the short/overload) |
| Inverter shows "battery fault" / comm error | Temporary BMS communication glitch | Yes (check cable first) |
| Voltage drops suddenly under load | Cell imbalance or a weak cell | Partial—reset then balance; see the balancing guide |
| Swollen case, leaking, or burning smell | Physical cell damage | No—stop using and replace |
Safety note: if the battery is swollen, leaking, cracked, or gives a burning smell, do not reset it. That indicates physical cell damage. Disconnect it, move it to a safe fire-resistant area, and contact the manufacturer for replacement.
Before You Reset: Tools & Finding the Reset Button
Gather what you need before touching any terminals:
- A digital multimeter (DC voltage) to confirm pack and cell voltage
- A LiFePO4-specific charger (14.6V / 29.2V / 58.4V for 12V / 24V / 48V) with a 0V wake-up or force-charge mode if possible
- Insulated tools / gloves and, for jump-start wake-up only, a jumper lead with an in-line 10-15A fuse
- The BMS manufacturer's app (Bluetooth) or software (CAN/RS485/USB) for smart packs
Where Is the BMS Reset Button?
Reset button locations vary by brand and model. Check these places in order:
- Terminal block cover: a small recessed button near the positive/negative terminals, often under a rubber cap or plastic cover
- Side or rear panel: rack-mounted and high-capacity batteries often place it beside the communication ports (CAN / RS485)
- Front panel on rack modules: a small button next to the status LEDs (common on 48V server-rack batteries such as PAOERIC-type modules)
- LCD/BMS display menu: batteries with a screen may expose reset through an on-screen menu (use the mode/select buttons)
- Power switch: some batteries use the main power switch as a reset—turn it off, wait 30 seconds, then on
- No physical button: many compact 12V drop-in replacements have none—use the charge wake-up (Method 3) instead
If you cannot find a button, check the user manual or the brand-specific section below. Some BMS units reset automatically after a period of disconnection, while others require a charger wake-up sequence or an app command.
5 Methods to Reset BMS on LiFePO4 Battery
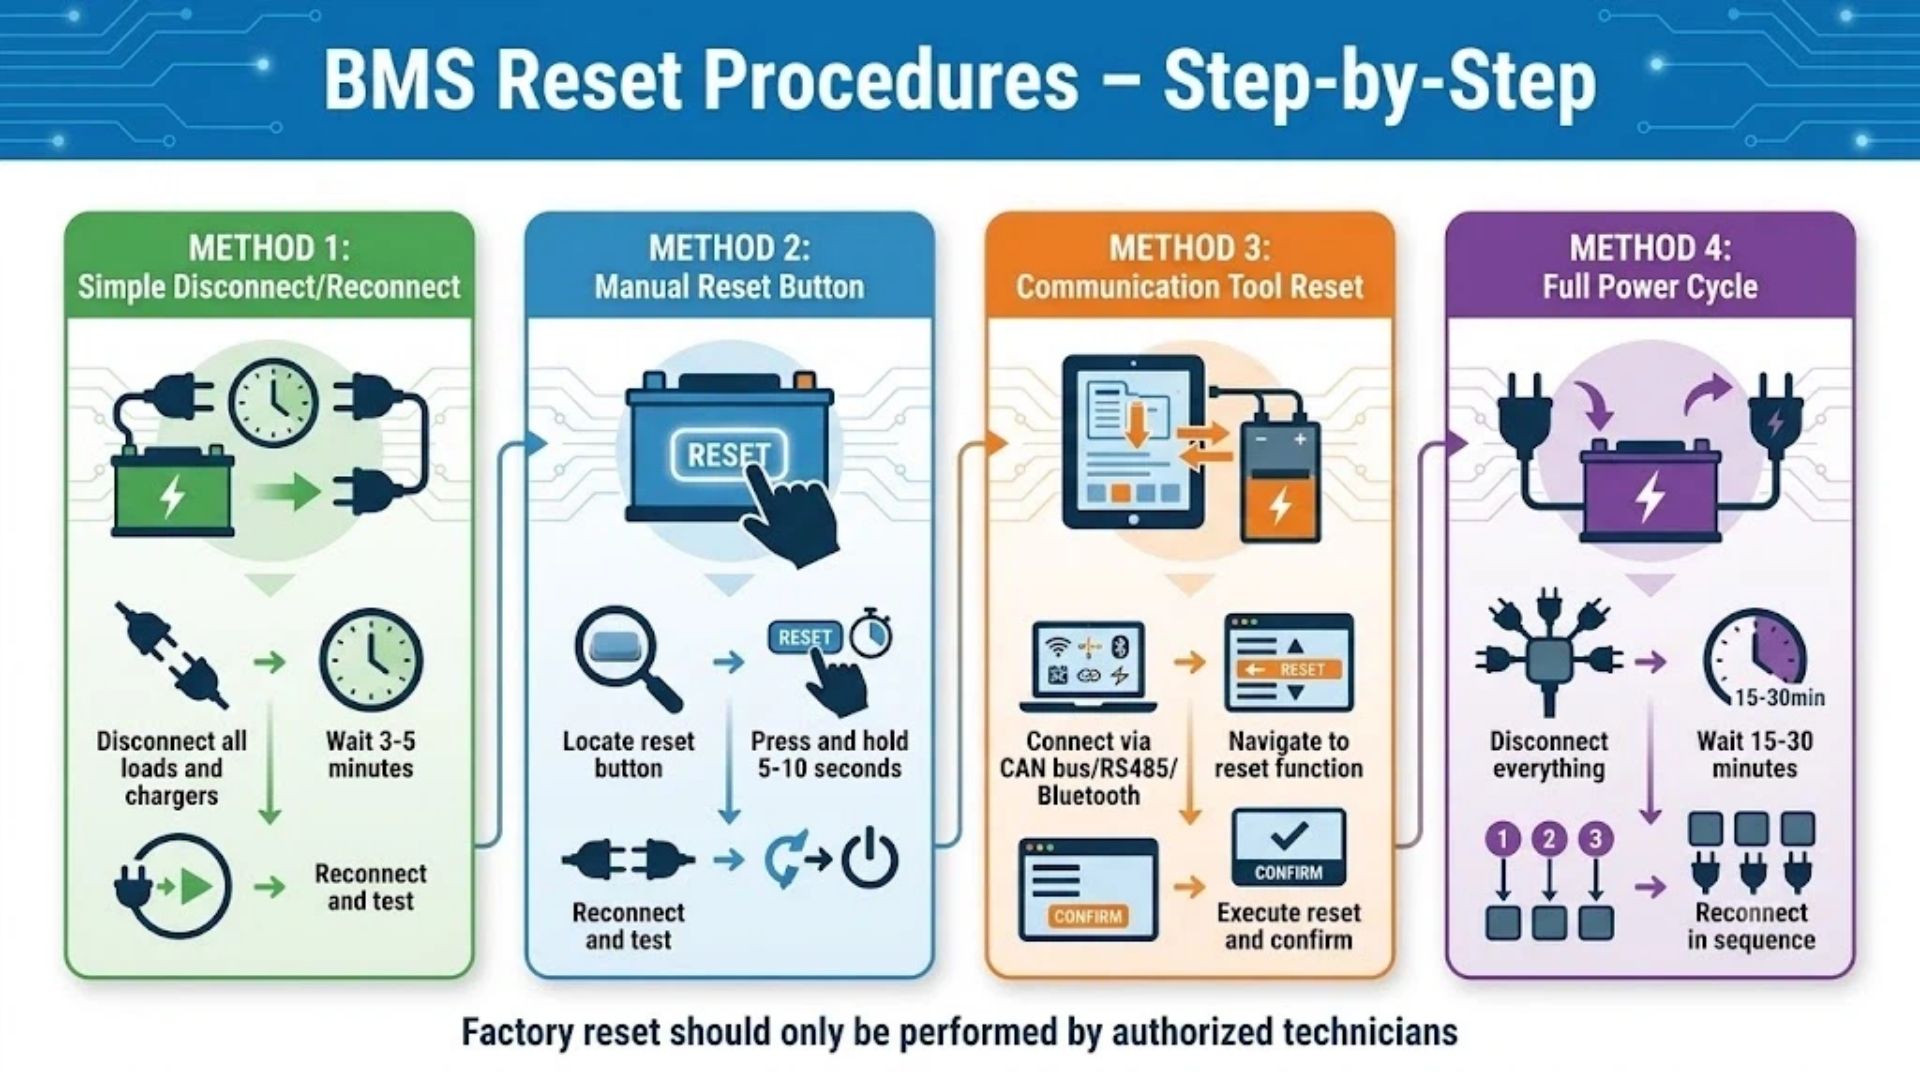

The universal 4-step quick reset (any brand): (1) disconnect all loads, then the charger; (2) wait 5-30 minutes (3-5 for a routine trip, 10-30 if deeply discharged); (3) reconnect the charger only and let the BMS see charge voltage; (4) verify voltage, then reconnect loads smallest-first. This is the same core as Method 1 below—start here and move to the advanced methods only if it fails.
Start with Method 1 and work down. About 80% of LiFePO4 BMS issues are resolved by Method 1 or 2.
Method 1: Disconnect/Reconnect (Resolves ~80% of Cases)
The easiest and most effective reset; it lets the BMS capacitors discharge and clears the fault latch.
Step 1 — Disconnect all loads: turn off the inverter / main DC switch, remove DC loads (lights, pumps, appliances), and disconnect parallel links between multiple packs.
Step 2 — Disconnect the charger: unplug the charger from AC first, then from the battery terminals.
Step 3 — Wait: leave the battery fully isolated for 3-5 minutes (10 minutes if deeply discharged) so the capacitors discharge and fault memory clears.
Step 4 — Reconnect the charger first: connect the LiFePO4 charger, then plug into AC. The BMS should wake when it sees charge voltage. After a deep discharge, charge at a low 5-10A for the first 30 minutes.
Step 5 — Reconnect loads one by one: once the battery shows nominal voltage (12.8V / 25.6V / 51.2V) and accepts charge, add the smallest load first to avoid re-tripping over-current.
Step 6 — Verify: multimeter should read nominal voltage and the charger should show rising voltage/current. If it stays at 0V or no response, go to Method 2.
Method 2: Physical Reset Button (If Equipped)
Common on commercial and high-capacity batteries.
- Locate the button using the guidance above (or a "RST" pin on some BMS boards).
- Press and hold for 5-10 seconds; expect an LED flash or a relay click.
- Release and wait ~30 seconds for the BMS to reboot.
- Reconnect the charger and confirm the battery responds. If there is no button, skip to Method 3.
Method 3: Charge Wake-Up / "Jump Start" (Deeply Discharged 0V Packs)
When a pack has sat at 0V for weeks, a standard charger may see 0V and refuse to output, so the BMS never wakes. A wake-up raises voltage just enough to re-enable the charge MOSFET.
- Use a LiFePO4 charger with a 0V wake-up / boost / force-charge mode and leave it connected for 10-30 minutes (be patient).
- If you have no such charger, parallel-connect a fully charged LiFePO4 battery of the same voltage, positive-to-positive and negative-to-negative, through an in-line 10-15A fuse, for 5-10 minutes.
- Once the dead pack shows voltage (even 8-10V on a 12V pack), disconnect the jumper, connect the LiFePO4 charger, and charge at ~5A for the first hour, increasing current as voltage rises.
For a pack at 0V for months, use the full procedure: the complete step-by-step wake-up, bypass/boost details, multimeter checkpoints, and what to do when the charger still won't recognize the pack are in our dedicated How to Wake Up a LiFePO4 Battery guide. Warning: LiFePO4 only—never use a car battery or high-current power supply to jump-start a lithium pack, and never attempt this on NMC.
Method 4: BMS App / Communication Tool Reset (Smart Packs)
Smart BMS units with Bluetooth, CAN bus, or RS485 allow a software reset—the norm on commercial BESS and high-end batteries.
- Connect with the manufacturer's app (Bluetooth) or software (CAN/RS485/USB): JK BMS, Daly, ANT, VictronConnect/VE.Configure, or the system SCADA/EMS for commercial BESS.
- Read the fault log first so you understand and can remove the trigger before clearing it.
- Go to "Faults / Diagnostics" and choose "Clear Faults" or "Reset BMS", acknowledging warnings.
- Verify per-cell voltage in the app—healthy cells sit within 0.05V; a lagging cell needs a balance charge (see the balancing guide).
Method 5: Full Power Cycle + Factory Reset (Last Resort)
Use only when everything else fails and you have the BMS configuration backed up.
- Disconnect all loads, chargers, and communication cables; remove the BMS fuse if accessible; wait 15-30 minutes for full capacitor discharge.
- Reconnect and measure at cell level, not just the output terminals—if cell voltage is present but output is 0V, the BMS is still in protection.
- Factory reset via software only if you have the saved settings. This erases voltage thresholds, current/temperature limits, and capacity calibration, all of which must be re-entered before service; wrong settings can damage the pack or create a hazard.
For Enerbe LiFePO4 batteries, factory reset should only be performed by authorized technicians—contact our technical support team before attempting one.
How to Unlock a BMS That Won't Respond
Sometimes a BMS is locked in protection and the basic reset does nothing—no output, no charger recognition, no button response. "Unlocking" is simply clearing that latched fault. Work through these in order:
- Full power cycle: disconnect everything (loads, charger, comms cables), remove the BMS fuse if accessible, wait 30 minutes, then reconnect only the charger.
- Jump-start wake-up: if the pack is at 0V, parallel-connect a same-voltage fully charged LiFePO4 battery through a 10-15A fuse for 5-10 minutes to raise voltage enough for the BMS to activate (full detail in the wake-up guide).
- Software unlock: use the manufacturer's app/software (Bluetooth/CAN/RS485) to read and clear fault codes, then reset.
- Factory recovery: ask the manufacturer for a factory reset code or firmware recovery procedure.
If none of these work and individual cell voltages read normal (3.0-3.3V per cell), the BMS hardware itself may have failed (MOSFET, current sensor, or controller) and needs warranty replacement rather than another reset—see the hardware-failure section below.
Resetting 48V Rack-Mounted & Solar Battery BMS
A 48V lithium battery BMS reset follows the same principles but adds a master BMS, multiple modules, and a DC bus/inverter sequence. Do not reconnect the inverter/PCS until every module reports normal voltage and no faults.

48V / 51.2V Rack-Mounted Battery Reset (Data Center, Telecom, Commercial ESS)
- Shut down the inverter/PCS and disconnect the battery from the DC bus.
- If the rack has a master BMS / battery management unit, power it off for 5 minutes, then back on.
- For individual modules, press the module-level reset button on the front panel (near the status LEDs) or disconnect the module from the rack bus for 10 minutes.
- Reconnect and verify each module's voltage and status through the rack monitor or CAN bus.
- Only reconnect the inverter/PCS after all modules show normal voltage and zero active fault codes.
48V Solar Energy Storage Reset
- Disconnect the solar panels from the charge controller first (to prevent backfeeding during the reset).
- Turn off the inverter and disconnect the battery.
- Wait 10-15 minutes, then reconnect the battery.
- Reconnect the solar charge controller and confirm charging resumes.
- Finally reconnect the inverter and verify normal operation. Use a 58.4V LiFePO4 charger if a wake-up is needed.
For module specifications, master/slave BMS architecture, and procurement of rack systems, see our 48V Rack-Mounted LiFePO4 Battery Guide for Project Buyers and the rack-mounted battery products.
LiFePO4 BMS vs NMC/LTO: What's Different?
Not all lithium BMS units behave the same. LiFePO4's voltage thresholds and safety characteristics differ from NMC and LTO, which changes how the BMS trips and how you reset it.
| Parameter | LiFePO4 (LFP) | NMC (NCA) | LTO |
|---|---|---|---|
| Nominal cell voltage | 3.2V | 3.6-3.7V | 2.3-2.4V |
| Full charge voltage | 3.65V | 4.2V | 2.8V |
| Cut-off discharge voltage | 2.5V | 2.7-3.0V | 1.5-2.0V |
| Charge temperature range | 0°C to 45°C | 0°C to 45°C | -30°C to 55°C |
| Thermal runaway onset | Very low risk (~270°C) | Higher risk (150-200°C) | Very low risk |
| BMS reset difficulty | Easy (conservative, recoverable) | Harder (may need maker tool) | Easy |
| 0V recovery rate | High (most packs recover) | Low (often permanent) | High |
Key takeaway: LiFePO4 BMS units are conservative precisely because the chemistry is so safe—they would rather shut down than risk damage. A 0V LiFePO4 pack is therefore usually in protection, not dead, and a reset plus slow charge recovers most of them. A 0V NMC pack is far more likely to be permanently damaged.
Brand-Specific LiFePO4 BMS Reset Methods
BMS hardware differs by brand, so reset steps vary. Always read the fault before clearing it.
Enerbe / A&S Power
- Method 1 (disconnect/reconnect) resolves most cases.
- Smart models: clear faults in the Enerbe BMS app (Bluetooth) via Method 4.
- Commercial rack-mount: use the RS485/CAN interface or the front-panel reset button (see the 48V sequence above).
- Support: info@aspowerbattery.com for firmware updates and factory-reset assistance.
Renogy
- Use the Renogy DC Home app (Bluetooth) → Device Settings → Fault Reset / Clear Fault Codes.
- Some models have a side-panel reset button near the terminals—press and hold 5 seconds.
- No-button models: disconnect loads, connect the Renogy LiFePO4 charger, and allow 15-30 minutes for charge wake-up.
Victron Energy
- VictronConnect app (Bluetooth) → select the battery/BMS → Settings → Reset to defaults / Clear alarms.
- Physical: press and hold the BMS button for 5 seconds until the LED flashes.
- Wired systems: use VE.Configure over VE.Direct for advanced fault clearing. Always keep Victron-approved thresholds because the BMS is tightly integrated with Victron inverters and charge controllers.
Liontron
- Most Liontron packs have no visible reset button—use disconnect/reconnect: isolate all loads and chargers for 10-15 minutes, then reconnect the charger.
- Smart models: clear faults in the Liontron app or a compatible BMS app.
- Deeply discharged packs: use a wake-up-capable LiFePO4 charger for 30-60 minutes. In RV/marine use, verify the inverter low-voltage cutoff (commonly 12.0V for 12V, 24.0V for 24V) to stop repeat trips.
Supervolt
- Most reliable reset is the full disconnect/reconnect (15-30 minutes), then charger only.
- Look for a small reset pinhole under the terminal cover or on the side panel—use a paperclip for 5-10 seconds.
- Most models lack an app, so charge wake-up is the main tool for deeply discharged packs; typical warranty is 5 years.
Dakota Lithium, Big Battery & Battle Born
- Dakota Lithium: robust BMS that rarely needs manual reset—use the charge wake-up method.
- Big Battery: disconnect/reconnect, the terminal-block reset button, or the master BMS display menu on large systems.
- Battle Born: disconnect for 10 minutes then reconnect; the BMS self-recovers most faults.
JK BMS & Daly BMS (Used Inside Many Brands)
- JK BMS: app → Settings → Restore Factory Settings / Clear Faults; some boards expose an "RST" pin—short to GND for 3 seconds.
- Daly BMS: Daly software over a USB-to-RS485 cable → System → Reset; physically, disconnect all wires and BMS power for 5 minutes. A factory reset often requires the maker's configuration file afterward.
- Generic / no-name: Method 1 is your best option; if it fails the BMS may be non-serviceable.
Common BMS Fault Codes and What They Mean
BMS units report faults via LED, app, or display. Here are the standard codes and the matching reset action.
| Code | Meaning | LiFePO4 Context | Reset Action |
|---|---|---|---|
| OVP | Over-voltage protection | Cell above 3.65V—usually wrong charger voltage | Method 1 or 2 |
| UVP | Under-voltage protection | Cell below 2.5V—most common fault, usually recoverable | Method 1, then Method 3 wake-up |
| OCP (Discharge) | Over-current, discharging | Load exceeded BMS rating—check inverter vs battery size | Reduce load, Method 1 or 2 |
| OCP (Charge) | Over-current, charging | Charge current too high—use a lower-current charger | Method 1 or 2 |
| SCP | Short circuit protection | Short detected—inspect and fix wiring before resetting | Fix short, Method 1 or 2 |
| OTP | Over-temperature protection | Above ~45°C in charge—cool before resetting | Cool down, Method 1 |
| UTP | Under-temperature protection | Below 0°C in charge—lithium-plating risk | Warm above 5°C, Method 1 |
| CELL IMB | Cell imbalance | Spread >0.1V—older pack or after deep discharge | Method 4 then balance charge |
| COMM ERR | Communication error | CAN/RS485/Bluetooth lost—check cables/connectors | Reseat cable, Method 4 |
Reset Didn't Work? Fixable Fault vs Hardware Failure
Work through the resettable causes first; only then conclude the BMS or cells have failed.
Fixable Causes to Check First
- Charger: confirm it is LiFePO4-correct (14.6/29.2/58.4V) and outputs at 0V (wake-up). A lead–acid charger or one that refuses 0V will look like a failed reset.
- Wiring & connections: check for a blown inline fuse, loose or corroded terminals, reversed leads, and tripped external breaker.
- Cell voltages: measure each cell. If one is far below the others, the pack needs a wake-up and balance, not another reset.
- Temperature: a pack below 0°C or above 45°C will refuse charge regardless of reset.
Signs of Genuine Hardware Failure (Reset Will Not Fix)
- Won't hold a charge: voltage collapses within minutes of disconnecting the charger—internal short or severely degraded cells.
- One cell stays at 0V/very low even after wake-up and balancing—a dead cell needing replacement.
- Fault code returns immediately after every clear—failed MOSFET, current sensor, or temperature sensor.
- Normal cell voltage (3.0-3.3V each) but 0V at the output terminals after every reset method—the BMS power stage has failed.
- BMS runs hot in normal operation, or cannot communicate on any interface.
- Physical damage (swelling, cracked case, electrolyte leak, burned terminals) or end of life (4,000+ cycles and below ~60% rated capacity).
Do not open or repair a high-current LiFePO4 pack yourself. If the signs above appear, contact the manufacturer or a qualified technician for warranty service. For a pack that simply will not charge for reasons other than a BMS latch, the LiFePO4 battery not charging troubleshooting guide covers all seven common causes.
After the Reset: Balancing, Calibration & Prevention
Balance and Calibrate After a Deep Trip
After an over-discharge or imbalance reset, run a full charge to 100% and hold through the constant-voltage (CV) stage so the BMS can passive-balance the cells; a healthy pack should settle within ~0.05V cell-to-cell. If the SOC percentage then reads erratically, perform one full charge-to-discharge cycle to recalibrate capacity. The complete procedure is in our How to Balance LiFePO4 Batteries guide, and correct voltage/current settings are in the charging guide.
Prevention: Avoid Future Resets
| Measure | Why It Matters for LiFePO4 |
|---|---|
| Don't discharge below 10% SOC | Repeated deep discharge stresses cells and triggers UVP |
| Use a LiFePO4-specific charger | Lead–acid profiles (14.4V float vs 14.6V) trigger OVP or undercharge |
| Match inverter to BMS current rating | An oversized inverter on an undersized BMS trips OCP at peak load |
| Charge between 5°C and 40°C | No charging below 0°C (lithium plating) or above 45°C; heat in winter |
| Check connections every 3 months | Loose terminals cause voltage drop and heat, tripping SCP/OTP; torque to spec |
| Full charge every 3-6 months | Activates passive balancing and prevents imbalance faults during storage |
| Store at 50-70% SOC | Storing at 100% or 0% accelerates degradation and UVP; see the storage & maintenance guide |
| Monitor cells in the BMS app | Catch imbalance early; healthy cells stay within ~0.05V |
B2B Fleet & ESS Maintenance to Reduce Reset Downtime
For integrators, data-center operators, and solar installers managing fleets, these practices cut BMS-related downtime:
- Set low-voltage cut-off to the maker's threshold (typically 40V for 48V, 20V for 24V, 10V for 12V) and never let packs sit at 0% SOC.
- Monthly voltage and fault-code checks on critical UPS/telecom backup to catch imbalance early.
- Quarterly full charge and 4-hour balance to preserve cell health and accurate SOC.
- Storage protocol: 50-60% SOC at 15-25°C, recharged to 50% every 3-6 months.
- Keep BMS firmware current—updates improve protection logic, balancing accuracy, and comms stability.
- Log every reset (date, symptom, method, outcome); repeated resets on one unit flag a chronic over-discharge, failing cell, or incompatible charger.
For qualifying vendors and avoiding costly procurement mistakes, see our How to Choose a LiFePO4 Battery Supplier and the BESS certification guide.
Related Resources
-
How to Wake Up a LiFePO4 Battery — full deep-discharge/0V wake-up and charger-bypass procedure
-
What Is a LiFePO4 BMS? Functions, Parameters & Selection Guide — BMS protections, parameters, comms, and how to choose one
-
How to Balance LiFePO4 Batteries — passive vs active balancing and cell-voltage checks
-
LiFePO4 Battery Not Charging? 7 Causes & Fixes — charger, fuse, wiring, and temperature causes beyond a BMS latch
-
How to Charge LiFePO4 Batteries — correct charge voltage, current, and CV stage
-
LiFePO4 Battery Safety Guide — handling, storage, installation, and fire safety
-
48V Rack-Mounted LiFePO4 Battery Guide — rack specs, master/slave BMS, and procurement
-
LiFePO4 Battery Storage & Maintenance — SOC, temperature, and long-storage protocol
Frequently Asked Questions
How do I reset my LiFePO4 BMS?
Disconnect all loads and chargers, wait 3-5 minutes for the BMS capacitors to discharge, then reconnect the charger first. This disconnect/reconnect resolves about 80% of LiFePO4 BMS protection events. If it fails, use the physical reset button (5-10 seconds), a charge wake-up for a 0V pack, or the manufacturer's app to clear faults (Bluetooth/CAN/RS485). A factory reset is a last resort and needs the saved BMS configuration.
What does resetting a BMS actually do?
A BMS reset restarts the Battery Management System and clears the latched fault state after it disconnected the pack for an unsafe condition (over-discharge, over-current, short circuit, temperature extreme, or imbalance)—much like rebooting a frozen computer. A normal reset does not change voltage thresholds, current limits, or capacity calibration. Only a factory reset returns the BMS to default settings, which then have to be reconfigured.
Why is my LiFePO4 battery showing 0V?
A 0V LiFePO4 battery is almost always in BMS protection (usually under-voltage from over-discharge), not permanently dead. LiFePO4 tolerates deep discharge far better than NMC, and most 0V packs recover with a reset and a slow charge. Use disconnect/reconnect first; if the charger will not recognize a pack that has sat at 0V for weeks, use the charge wake-up method or the full wake-up guide, charging at 5-10A for the first hour.
How do I unlock a BMS battery that won't respond?
Work in order: (1) full power cycle—disconnect loads, charger, and comms cables, remove the BMS fuse if accessible, wait 30 minutes, then reconnect only the charger; (2) jump-start wake-up—parallel-connect a same-voltage fully charged LiFePO4 battery through a 10-15A fuse for 5-10 minutes; (3) software unlock—clear fault codes in the manufacturer's app/software; (4) request a factory reset code or firmware recovery from the manufacturer. If cell voltages read normal but output stays 0V, the BMS hardware has likely failed and needs warranty replacement.
How do I reset a LiFePO4 BMS without a reset button?
Use the charge wake-up method: disconnect all loads, connect a LiFePO4-specific charger (ideally with 0V wake-up/force-charge mode), and leave it connected for 10-30 minutes so the charge voltage re-enables the BMS charge MOSFET. If the charger will not output at 0V, switch to a charger with a recovery/boost mode or use the same-voltage parallel battery method. Many compact 12V drop-in batteries have no button at all and are designed to recover this way.
Will disconnecting the battery reset the BMS—and can I reset without disconnecting?
Yes: isolating the battery from all loads and chargers for 5-30 minutes resets most BMS units, which is the core of the standard procedure. If the pack is deeply discharged, disconnecting alone may not be enough—you must reconnect a charger to wake the charge MOSFET. If you prefer not to disconnect, a physical reset button (5-10 seconds) or an app "Clear Faults" command resets many smart BMS units without full isolation, but disconnect/reconnect remains the most reliable universal method.
Where is the BMS reset button located?
Most commonly near the positive/negative terminals under a rubber cap, on the side/rear panel next to the CAN/RS485 ports, or (on 48V rack modules) on the front panel beside the status LEDs. Batteries with an LCD may hide reset in an on-screen menu, and some use the main power switch (off 30 seconds, then on). Many compact 12V drop-in batteries have no button at all—use charge wake-up instead. Check the manual or the brand section above if you cannot locate it.
How do I reset my 48V lithium or rack battery BMS?
Shut down the inverter/PCS and disconnect the battery from the DC bus; power off the rack's master BMS for 5 minutes and back on; reset individual modules with the front-panel button or by isolating them from the rack bus for 10 minutes; verify every module shows normal voltage and no faults via the rack monitor/CAN; only then reconnect the inverter/PCS. For solar, disconnect the panels from the charge controller first and reconnect them before the inverter. Use a 58.4V LiFePO4 charger if wake-up is required.
How long does a LiFePO4 BMS reset take?
A disconnect/reconnect takes about 10 minutes total (3-5 minutes waiting plus reconnection). A button reset takes ~10 seconds plus a 30-second reboot; an app reset takes 1-2 minutes. A deep-discharge wake-up takes 5-10 minutes to activate plus 1-2 hours of low-current charging to stabilize. A factory reset takes 15-30 minutes plus full reconfiguration.
Will a reset erase my settings or capacity—and how is it different from calibration?
A standard reset (Methods 1-4) clears active faults and reboots the processor only; thresholds, current/temperature limits, and capacity calibration remain intact. A factory reset erases custom settings and returns defaults, requiring full reconfiguration. Calibration is separate—it relearns true capacity via a full charge/discharge cycle when the SOC % is inaccurate. Reset first to clear the fault, then calibrate only if the SOC reading stays wrong.
How do I know if my LiFePO4 BMS is bad?
Suspect a failed BMS if: 0V output persists after every reset and a jump-start; individual cells read a normal 3.0-3.3V but the output terminals read 0V; the same fault code returns immediately after clearing; the BMS runs hot in normal use; or it cannot communicate on Bluetooth/CAN/RS485. These point to a failed MOSFET, sensor, or controller. Most LiFePO4 batteries carry a multi-year BMS warranty—contact the manufacturer for replacement rather than opening the pack yourself.
Why does my LiFePO4 BMS keep tripping?
Repeated trips mean an underlying cause that resetting cannot fix: a non-LiFePO4 charger (wrong voltage), an inverter/load exceeding the BMS continuous current, imbalanced or failing cells, charging below 0°C or above 45°C, a parasitic drain slowly emptying the pack, or outdated firmware. Read the fault history in the app to identify the trigger and fix the root cause instead of repeatedly resetting.
Why is my LiFePO4 battery still not charging after a reset?
If the reset cleared the fault but charging still won't start, the pack is likely in deep sleep (use the charge wake-up / wake-up guide), or the cause is not the BMS latch at all. Check charger voltage (14.6/29.2/58.4V), a blown inline fuse, loose or reversed wiring, and low-temperature lockout below 0°C. The full set of causes is in the not-charging troubleshooting guide.
Do Renogy, Victron, Liontron, Supervolt and Dakota BMS units reset differently?
The principle is identical; the interface differs. Renogy uses the DC Home app (Device Settings → Fault Reset) or a side button; Victron uses VictronConnect → Settings → Clear alarms (or VE.Configure wired); Liontron and Supervolt mostly rely on disconnect/reconnect (10-30 minutes) plus charge wake-up, with Supervolt sometimes using a pinhole; Dakota Lithium rarely needs manual reset and recovers via charge wake-up; Big Battery and Battle Born self-recover or use a terminal/menu reset. JK and Daly BMS boards (used inside many brands) reset through their own apps or software. See the brand section for full steps.
Summary
Resetting a LiFePO4 BMS is usually quick—under 15 minutes:
- Method 1 — Disconnect/reconnect: resolves ~80%—isolate everything, wait 3-5 minutes, reconnect the charger first.
- Method 2 — Reset button: press and hold 5-10 seconds if equipped.
- Method 3 — Charge wake-up/jump-start: for deeply discharged 0V packs (full steps in the wake-up guide).
- Method 4 — App/software: clear faults over Bluetooth/CAN/RS485 and check cell balance.
- Method 5 — Full power cycle/factory reset: last resort, technicians only, erases settings.
- Unlock a locked BMS with the 30-minute power cycle, wake-up, software clear, then maker recovery.
- 48V rack/solar adds a master-BMS power cycle, module resets, and a verify-before-reconnect sequence.
Remember, a 0V LiFePO4 pack is usually in protection, not dead. Use a LiFePO4-specific charger, avoid discharge below 10%, charge within 5-40°C, and full-charge every 3-6 months to keep cells balanced—then resets become rare.
Enerbe LiFePO4 batteries ship with an advanced smart BMS offering full protection, Bluetooth/CAN/RS485 monitoring, automatic balancing, and multi-year warranty coverage. If a reset cannot clear a persistent fault, our engineering team will help diagnose it. For wholesale pricing, custom configurations, or technical support, contact our team.
Get In Touch
Need a quote, BMS fault-code support, or a custom LiFePO4 configuration? Contact Enerbe today.
📄 Request a Technical Datasheet
Contact Us →📞 Speak with Our Engineering Team
Get In Touch →🔗 Browse Our Custom Battery Solutions
View Products →Dongguan A&S Power Technology Co., Limited.
Building 1, No. 2, Keji 9th Road,
Songshan Lake, Dongguan, Guangdong, China
📞 +86 137 1383 1631
✉ info@aspowerbattery.com
Stay Charged. Stay Connected.



How to Wake Up a LiFePO4 Battery: Revive a Deeply Discharged/0V Pack (2026)
Are LiFePO4 Batteries Safe? Fire, Explosion & Home Use Facts (2026)
Related Article



Get In Touch
Have questions about custom lithium batteries, energy storage solutions, or lead-to-lithium conversion? Our team is ready to help. Send us a message and we’ll respond within 24 hours.

Building 1, No. 2, Keji 9th Road, Songshan Lake, Dongguan, Guangdong, China
Office Address

info@aspowerbattery.com
Email Us

+86 137 1383 1631
Call Us

Sun - Fri (08AM - 10PM)
Office Open